Pinpoint APM监控平台搭建
1 系统环境
Ubuntu 16.04 LTS hbase-1.2.6-bin.tar.gz(http://hbase.apache.org/) hbase-create.hbase(https://github.com/naver/pinpoint/tree/master/hbase/scripts) pinpoint-collector-1.7.2.war(https://github.com/naver/pinpoint/releases/tag/1.7.2) pinpoint-web-1.7.2.war(https://github.com/naver/pinpoint/releases/tag/1.7.2) pinpoint-agent-1.7.2.tar.gz(https://github.com/naver/pinpoint/releases/tag/1.7.2) apache-tomcat-8.5.24.tar.gz(部署使用)2.部署过程
将需要的资源上传服务器,并确保已经安装Java环境
2.1 安装Hbase
1.解压hbase tar包
tar -zxvf hbase-1.2.6-bin.tar.gz2.修改hbase-env.sh的JAVA_HOME环境变量地址
export JAVA_HOME=/opt/apps/jdk/jdk1.8.0_131/3.修改hbase-site.xml配置文件
<configuration>
  <property>
    <name>hbase.rootdir</name>
    <value>file:///opt/apps/pinpoint/hbase-1.2.6/data</value>
  </property>
</configuration>
4.启动hbase
./start-hbase.sh5.查看Hbase是否启动成功
jpsroot@VM-0-15-ubuntu:/opt/apps/pinpoint/hbase-1.2.6/bin# jps
7652 HMaster
2277 Elasticsearch
14839 Main
7994 Jps存在Hmaster进程说明启动成功
6.初始化Hbase的pinpoint库
./hbase shell /opt/apps/pinpoint/hbase-create.hbaseroot@VM-0-15-ubuntu:/opt/apps/pinpoint/hbase-1.2.6/bin# ./hbase shell /opt/apps/pinpoint/hbase-create.hbase
2018-04-27 11:29:35,228 WARN [main] util.NativeCodeLoader: Unable to load native-hadoop library for your platform... using builtin-java classes where applicable
0 row(s) in 1.8260 seconds
0 row(s) in 4.2500 seconds
0 row(s) in 4.2420 seconds
0 row(s) in 1.2260 seconds
0 row(s) in 1.2180 seconds
0 row(s) in 1.2170 seconds
0 row(s) in 1.2210 seconds
0 row(s) in 2.2250 seconds
0 row(s) in 1.2250 seconds
0 row(s) in 8.2820 seconds
0 row(s) in 1.2220 seconds
0 row(s) in 2.2210 seconds
0 row(s) in 1.2250 seconds
0 row(s) in 1.2150 seconds
0 row(s) in 1.2150 seconds
TABLE
AgentEvent
AgentInfo
AgentLifeCycle
AgentStatV2
ApiMetaData
ApplicationIndex
ApplicationMapStatisticsCallee_Ver2
ApplicationMapStatisticsCaller_Ver2
ApplicationMapStatisticsSelf_Ver2
ApplicationStatAggre
ApplicationTraceIndex
HostApplicationMap_Ver2
SqlMetaData_Ver2
StringMetaData
TraceV2
15 row(s) in 0.1490 seconds7.初始化完成进入Hbase
./hbase shellroot@VM-0-15-ubuntu:/opt/apps/pinpoint/hbase-1.2.6/bin# ./hbase shell
2018-04-27 11:31:47,222 WARN [main] util.NativeCodeLoader: Unable to load native-hadoop library for your platform... using builtin-java classes where applicable
HBase Shell; enter 'help<RETURN>' for list of supported commands.
Type "exit<RETURN>" to leave the HBase Shell
Version 1.2.6, rUnknown, Mon May 29 02:25:32 CDT 2017查看当前初始化表是否存在
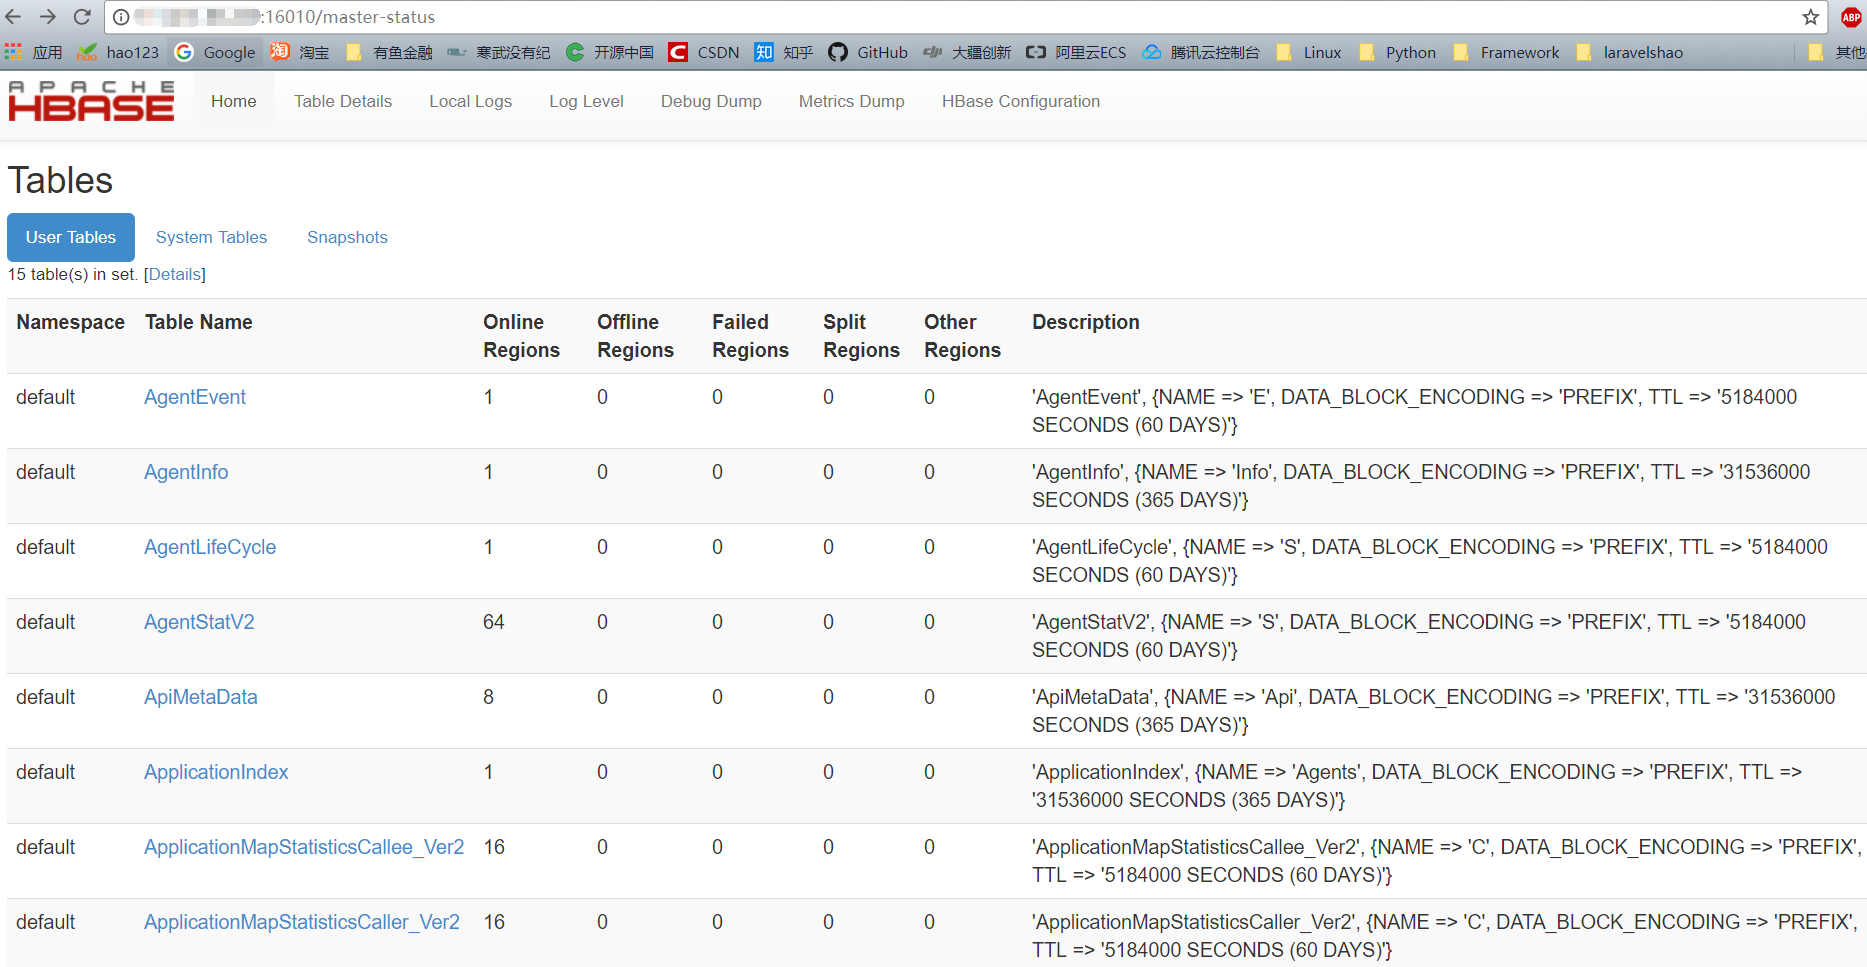
hbase(main):001:0> status ‘detailed’或登录Hbase web查看表是否初始化成功,浏览器访问 http://X.X.X.X:16010/master-status
2.2 安装Pinpoint Collector
1.创建目录pinpoint-collector,解压tomcat至该目录下
mkdir pinpoint-collector
tar -zxvf apache-tomcat-8.5.24.tar.gz -C ./pinpoint-collector/
2.因为我们这里pinpoint-collector、pinpoint-web安装在同一台机器上,需要确保端口不会冲突,修改tomcat server.xml文件
<Server port="18005" shutdown="SHUTDOWN">
<Connector port="18080" protocol="HTTP/1.1" connectionTimeout="20000" redirectPort="18443" />
<!--<Connector port="8009" protocol="AJP/1.3" redirectPort="8443" />-->
3.部署pinpoint-collector-1.7.2.war到tomcat并命名为ROOT
rm -rf ./pinpoint-collector/apache-tomcat-8.5.24/webapps/*
unzip pinpoint-collector-1.7.2.war -d ./pinpoint-collector/apache-tomcat-8.5.24/webapps/ROOT/
4.修改hbase.properties(./pinpoint-collector/apache-tomcat-8.5.24/webapps/ROOT/WEB-INF/classes/ hbase.properties)
# 修改hbase地址,本机默认即可
hbase.client.host=localhost
hbase.client.port=2181
2.3 安装Pinpoint Web
1.创建目录pinpoint-web,解压tomcat至该目录下
mkdir pinpoint-web
tar -zxvf apache-tomcat-8.5.24.tar.gz -C pinpoint-web/
2.修改tomcat server.xml文件
<Server port="28005" shutdown="SHUTDOWN">
<Connector port="28080" protocol="HTTP/1.1" connectionTimeout="20000" redirectPort="28443" />
<!--<Connector port="8009" protocol="AJP/1.3" redirectPort="8443" />-->
3.部署pinpoint-web-1.7.2.war到tomcat并命名为ROOT
rm -rf ./pinpoint-web/apache-tomcat-8.5.24/webapps/*
unzip pinpoint-web-1.7.2.war -d ./pinpoint-web/apache-tomcat-8.5.24/webapps/ROOT/
4.修改hbase.properties(./pinpoint-web/apache-tomcat-8.5.24/webapps/ROOT/WEB-INF/classes/hbase.properties)
# 修改hbase地址,本机默认即可
hbase.client.host=localhost
hbase.client.port=2181
5.启动pinpoint-collector、pinpoint-web服务
./pinpoint-collector/apache-tomcat-8.5.24/bin/startup.sh
./pinpoint-web/apache-tomcat-8.5.24/bin/startup.sh
查看tomcat日志看服务是否启动成功
tail -f ./pinpoint-collector/apache-tomcat-8.5.24/logs/catalina.out
tail -f ./pinpoint-web/apache-tomcat-8.5.24/logs/catalina.out
浏览器访问:http://X.X.X.X:28080 说明服务启动成功
2.4 安装Pinpoint Agent
1.创建目录pinpoint-agent,将pinpoint-agent解压至该目录
tar -zxvf pinpoint-agent-1.7.2.tar.gz -C ./pinpoint-agent/2.修改配置文件pinpoint.config
# 修改为pinpoint-collector地址,本机可不配置
profiler.collector.ip=127.0.0.1
3.添加探针有两种方式
修改部署项目的tomcat启动文件catalina.sh,增加探针,重启tomcat# 设置pinpoint-agent jar包位置
CATALINA_OPTS="$CATALINA_OPTS -javaagent:/opt/apps/pinpoint/pinpoint-agent/pinpoint-bootstrap-1.7.2.jar"
# 设置agent的ID
CATALINA_OPTS="$CATALINA_OPTS -Dpinpoint.agentId=pp20180428"
# 设置采集项目的名称,不能与其它项目重复
CATALINA_OPTS="$CATALINA_OPTS -Dpinpoint.applicationName=demo-app"java -javaagent:/opt/apps/pinpoint/pinpoint-agent/pinpoint-bootstrap-1.7.2.jar -Dpinpoint.agentId=pp-springboot -Dpinpoint.applicationName=springboot-app -jar spring-boot-demo-0.0.1-SNAPSHOT.jar这里使用Spring Boot方式启动完成之后,访问测试接口http://X.X.X.X:8080/hello
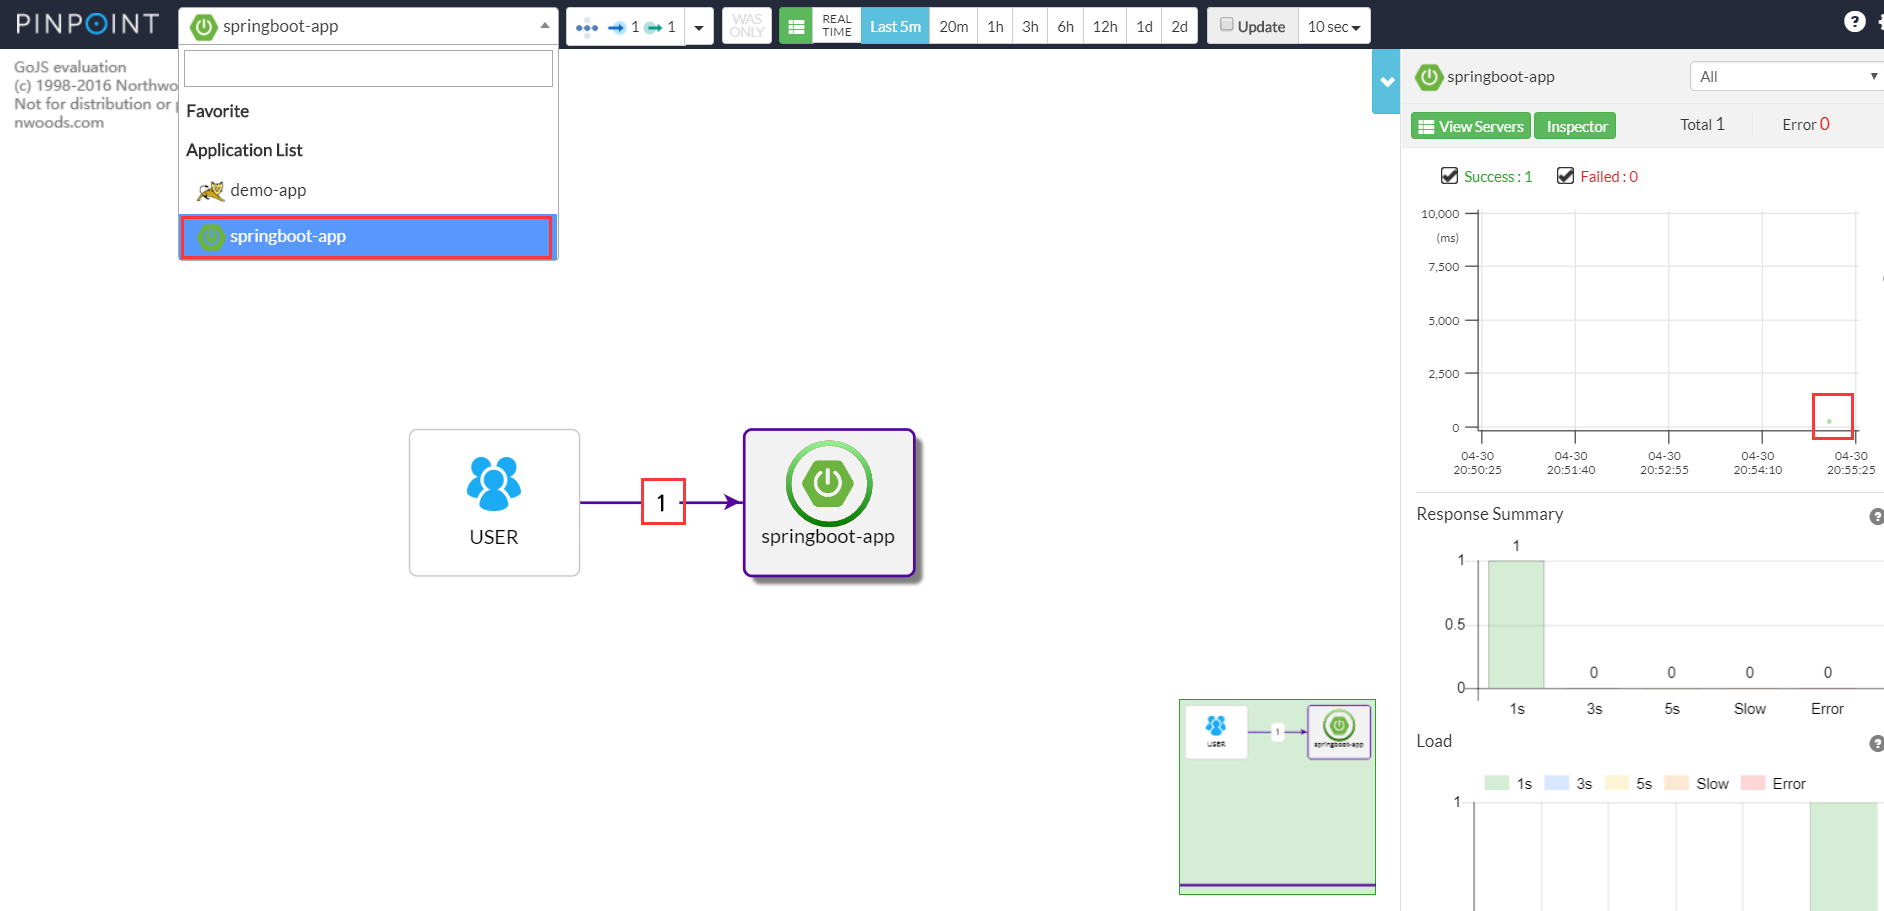
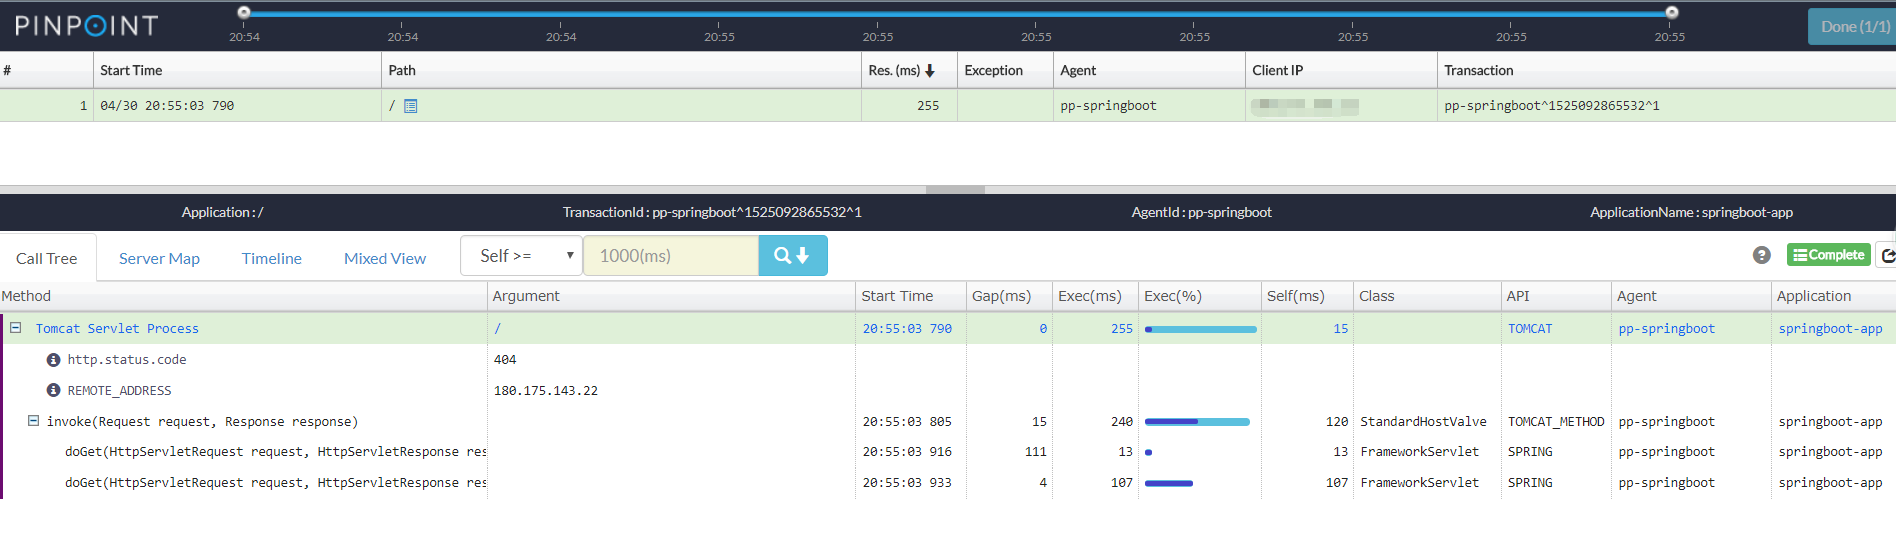
框选右侧采样点可以查看详情
3 参考资料
http://naver.github.io/pinpoint/installation.html#quick-overview-of-installation
http://iamlile.github.io/2017/10/06/apm/
https://blog.csdn.net/xiaozhuanddapang/article/details/75554807
https://blog.csdn.net/mingyu1016/article/details/53925611
http://bigbully.github.io/Dapper-translation/
文章来源:
Author:LaravelShao
link:https://my.oschina.net/LaravelShao/blog/1803428